Pages

Wednesday, January 8, 2014

Pleated Skirt Inspiration

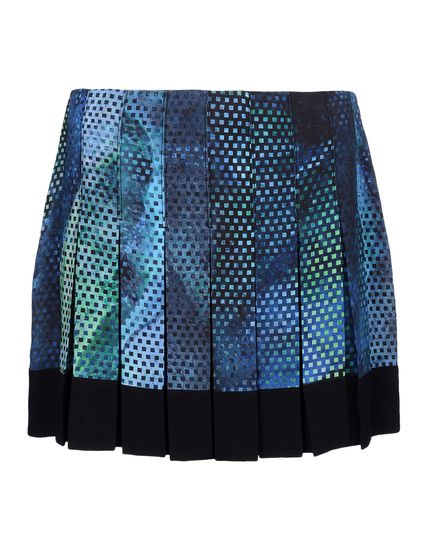
Proenza Schouler Mini
So snooping around the blogs I read I came across this lovely skirt from Proenza Schouler.

I have been watching the runways and seeing a ton of these lovely short pleated skirts.  I got to thinking that I could easily draft a pattern for a skirt like this for me.  I have a lot of fabric I could use in my stash following the inspiration here.

The Proenza skirt is made from silk georgette.  It is not my first gut reaction to use georgette for a pleated skirt, but then I began to imagine how the fabric would drape and move as I walk,  How luxe and pretty it would be to pair this with a simple black blouse and some black tights with my fave black booties.  Or how about an ivory sweater?  I could really play this look up or down.  It would be a nice transition piece too as it could be worn with or without tights to take it into spring.  Now, to find the time, haha.

Tuesday, January 7, 2014

Emergency Project: Cold Weather Waterproof Mittens (Part 2)


So last weekend I finished up the cold weather mittens just in time for the craziest weather we have seen in years.  The mittens are usable and soft, but not exactly the couture work I prefer to produce.  All in all, the wearers are happy and warm so it all ended well.  But some notes on the journey there.

I printed and cut out all of the patterns from my previous post (Emergency Project: Cold Weather Waterproof Mittens Part 1).  I looked them all over and ended up using the pattern from FleeceFun.com.

I had originally wanted to make these mittens waterproof but the weather came upon me faster than I had planned and a trip to the fabric store was not panning out.  I ended up pulling out the stash fabrics.  I usually sew for adult women so I did not have much fabric that was honestly appropriate for the cause. Thanks to a spree of pajama pant making in the fall, I did have small stash of polar fleece fabric.

I am not too fond of this stuff, but it makes good for items for the little ones and my husband that will need to withstand many trips through the wash and still stay warm.  Honestly for my husbands mitts I wish I would have had some boiled wool.  I could have gotten out the wool fiber and felted the proper fabric by hand, but spending hours laying out wool and then felting it in the middle of a snow storm was just not appealing.

Onto some shop talk.  I started out wanting to make these mittens extra warm, so I cut the outer layer from polar fleece and the lining from cotton flannel. I had a "bright" idea to use some fusible fleece batting on the lining fabric to increase the warmth.  I was also very "smart" and cut and fused both of the child sized gloves before really testing this idea out.

After assembly line rotary cutting the pieces and fusing the fleece I started sewing the mittens up.  There are good instructions on the site, but the seam allowance of 1/2 inch for both the lining and outer fabric did not work out so well.  I did the first glove using and trimmed it as best I could, but the thumb became way too small with the lining.  Additionally, my youngest boy did not like the stiffness of the fused flannel in the glove.  So for speed and sanity, on the kids gloves I skipped the lining.

To get the elastic in, I used some ribbon to create a casing inside the glove and 1/4 inch elastic to hold the glove on.  I just did quick rolled hem on the edge and voila, a mitten.  My older son soon decided he needed his gloves EXACTLY the same as his brother.  (My boys are 17 months apart, so they are more like twins.  They are also 5 and 7).  So in the same manner, mitten set number two was produced.

Now, on to my husband's mittens.  After my mistakes with the mittens for my kids, I decided to try a few changes.  I fused fleece to the large back hand piece but not to thumb lining pieces.  I was hoping this would add some wind resistance.  I also used 1/2" seam allowance on the lining pieces and a 1/4" seam allowance to the outer pieces to account for the bulk created by the two seams touching and the extra thickness in the fabrics.  I also decided to bind the edges rather than turn them.  I was lazy and sometimes I just don't want to turn pieces through a small hole when they are odd shaped.

It turns out I was correct and my hubby tested the mittens out a lot over the past few days.  The temps have been below zero here and he said his mittens kept his hands quite warm.  The kids love their gloves too.  They may not have turned out waterproof or quite the seamstress mastery I like to create, but my customers are happy and hands are warm so I can feel happy with a job well done.

Friday, January 3, 2014

A New Take on the Classic Tee

Retro Top 07/2013 #130 from BurdaStyle.com (Pattern)

So in my email pops this update from BurdaStyle featuring this classic retro top.  At first glance, I thought it was pretty boring.  Then I stared at it a while and thought that maybe it might be perfect to make in organza.  Maybe some sparkly trim, black on black.  It would be a fun way to take a close fitting tank and make it just a little cooler and more evening or wear it with jeans.  It would also be a great practice for French Seams on sleeves, something I feel I need to practice more.

Oh, too many projects and not enough time.

Thursday, January 2, 2014

Emergency Project: Cold Weather Waterproof Mittens (Part 1)


Today it is cold and it has snowed a little over an inch in my neck of the woods.  My boys are at home and want to go out and play, so we look in the hat and glove bin and lo and behold we have one of every set of gloves.  Ugh.  I check the forecast and the weather is about to take a turn for the cold, a high of 18 degrees as they get back to school on Monday.  So super mom has to figure out how to keep those little fingertips from freezing off, so here comes another emergency project.

I decided to be smart and google up some tuts out there so I can run by the fabric store tonight and finish them up two sets of gloves by the morning.  I found a few great resources out there.

The first tutorial I found was on Fleece Fun.  The Free Mitten Pattern on Fleece Fun looks very nice and comes with a great video tutorial.  Available for download are the child's size Small, Medium, and Large as well as Women's size Medium and Large and Men's Medium and Large.

Free Mitten Pattern on Fleece Fun (This is not my pattern, it is a link to a cool tutorial). 


I love the fact that these are lined.  In the tutorial, she uses fleece and minky fabric for the lining.  I am thinking that the glove need to be warmer, we are talking temps in the lower teens, and I want them waterproof.  I do love the shape of the gloves and the sizing, so I think I will be using this pattern.

So I did a little more snooping and found another great tutorial at Sew Can Do.  Here you will find this great tutorial for Insulated Snow Mittens.  I love the idea of using the insulation material as an underlining.  She also suggests using laminated polyester for the outside of the glove, making them waterproof.

Insulated Snow Mittens Pattern and Tutorial by Sew Can Do

I am sure I will be combining both of these great tutorials to make my own version of an insulated mitten.  I am also going to adding a key hook to the gloves and a d-ring to each side of my boys' coats since they magically cannot seem to keep from losing their gloves at school.  I would not want all this hard work for nothing.

Keep on the lookout tomorrow for the results and pictures of what I made.

Free Book on Couture Sewing, A Great Find

Snooping around on the web I found this amazing book couture sewing techniques published on Issuu.  It is free but you must view it online.  The book by Linda Maynard covers many simple but useful couture techniques you can use all of the time.  Have fun reading!


Wednesday, January 1, 2014

Good Morning 2014

Good Morning 2014!


Today I embark on a new journey as I do every year about this time.  I like to think that as I am writing this, I am just a little bit better than I was this time last year.  I have learned so much this past year about sewing and about life and I plan to learn even more in this new year.

So here I am starting off a new blog.  I have thought for a long time about writing a blog as I am an avid creator.  I get a lot of people ask me how I find time to create so much in the precious little time I have at the end of each night, so I have decided that it is time for a blog. The plan is to blog EVERY single thing I create in 2014.  Phew, this is going to be hard, but I want to do this as a diary of sorts and to share my love and passion for creating.

So what will you be seeing here?  What projects do I have planned?  Well, as those who know me know so well, I have more than humanly possible planned for this year.  I am notorious for having random new ideas that just must be created and tend to interrupt current projects, so even though I have a plan, there is always something amazing hiding in back of my mind that will find its way out.

So here is the first project I will be working on for 2014.

1. The Belated Trumpet Skirt Christmas Gift

The Story: As always, I put too much on my plate to sew in the allotted amount of time.  One present that got left behind was my grandma's Christmas gift.  Now, this skirt has sort of a long story.  My youngest brother got married in the spring last year and I made the bride's dress (many posts on lessons learned from that crazy project will follow soon).  My grandmother made the flower girl's dress (my design to match the brides dress).  Throughout the crazy weeks of planning my grandma and I both had to find something to wear, so my grandma was inspired to sew a trumpet skirt from this amazing yellow lace.  Well, the clock ran out and I did not get a chance to draft the pattern and the fabric was set aside and never made.  So for Christmas I decided to steal the fabric and make the skirt for her.  So the first project this year will be to draft and make this skirt.

The Inspiration:  The inspiration for this skirt is sort of an old school long denim dress.  Something like this:

From Amazon - Link Here


The Fabric:

The fabric was selected from one of my fave fabric websites for when I want something not too pricey and fast - Fabric.com

The outermost layer will be a yellow stretch lace (because my grandma fell in love with the design) underlined with a stretch cotton twill to create a single fabric that has enough weight and a stiff enough drape to tolerate the design.  The cotton twill will be white under the yellow lace for a springtime look.  I am undecided as to whether to line this skirt as the twill is thick enough not to be see through (no undies showing please).

Here is the lace:

Giselle Stretch Lace from Fabric.com

The Design:

I am going to draft the design myself on this one.  This is only the third skirt I draft from scratch and I have resolved to make more of my own patterns this year, so wish me luck.  I will be creating the skirt with the help of the amazing book Patternmaking Made Easy by Connie Crawford.

Patternmaking Made Easy by Connie Crawford (my fave pattern drafting book)

Note:  Yes, this book is a pricey $95, but it is worth every penny.  The instructions are clear as day and the diagrams are so easy to follow.  I have several (too many to admit) books on flat pattern drafting and of them all I love this one the best.  If you join Connie's email list on her website, she sends coupons every once in a while so you camp out for a good sale.

The design will be a 6 panel trumpet skirt with some modifications to add my own personal designer flair of course.  Be on the lookout for many posts as I draft and test this pattern.  The skirt will be just above the ankle, a great length for grandma's thin figure and she love to  wear skirts with knee high heeled boots.

So what are you sewing in 2014?  Comments and questions are always welcome!

Tuesday, December 31, 2013

Mini Fabric Bolt Tutorial to Get Organized

From I Am Only One Woman
With the new year first thing in the morning, we start to turn to our resolutions.  Many of us sewists, aka fabricaholics, are always on the lookout for ways to organize our ever growing stash.  Here is a great tutorial for creating mini fabric bolts using materials from the dollar store and a little ingenuity to make our sewing rooms look like a fabric store.  Yippee!

Go see the tutorial at I am Only One Woman